Editing SFA Authorizations
- You must have keygiver privileges for an SFA, as well as all of
its piggybacked SFAs, to grant or remove authorization for that system.
In addition, you must have A (System and SFA Authorization Editing)
authorization in the PAS system.
- See the PAS keygiver KnowledgeBase (ServiceNow)
for training information and documentation.
- For detailed information, see How
Piggybacked Authorizations Work.
- To set up changes to a user's authorizations:
- Select the user's PAS account.
- Click the Account menu.
- There are a few ways to open the Edit Account SFA Authorization
window:
- Click the Edit SFA Authorizations option.
- If you want to see the account authorizations before editing, click
the View Current Authorizations option, and then click the Edit
SFAs button.
- Click the View Current Authorizations option; right-click the SFAs
pane on the left, and then click the Edit SFAs option.
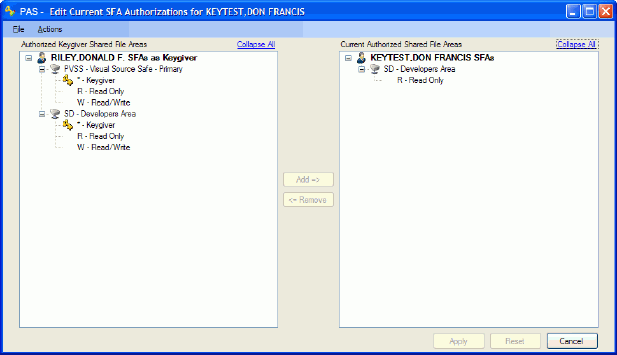
- The left pane displays the SFAs for which you have keygiver privileges.
- To display the available authorizations for an SFA, click its
 .
To hide the information, click
  .
.
- To display all of the authorizations for all of the SFAs, click
the Expand All link at the top right
of the SFAs list. Click Collapse All
to hide all the sub-entries.
- If you are a PAS SFA Administrator, to temporarily
add an SFA to your keygiver pane, click the SFA Admin menu, and then
click the option to Add an SFA to your keygiver list. Select an SFA
when prompted.
- The right pane displays the SFAs the selected account has authorization
to use.
- To display the authorizations a user has to use an SFA, including
whether the user is a keygiver, click its
 . To
hide the information, click
  .
.
- To display all of the authorizations for all of the SFAs the account
has, click the Expand All link at
the top right of the SFAs list. Click Collapse
All to hide all the sub-entries.

- To grant a type of authorization to use an SFA:
- Double-click the authorization in the keygiver pane.
- Right-click the authorization in the keygiver pane, and then click
the Add option in the popup menu.
- Click to select the authorization from the keygiver pane (left)
and drag it to the account pane (right).
- Click to select the authorization in the keygiver pane, and then
click the Add=> button.
- Click to select the authorization in the keygiver pane; next, click
the Actions menu, and then click the Add option.
- To remove a type of authorization to use an SFA:
- Double-click the authorization in the account pane.
- Right-click the authorization in the account pane, and then click
the Remove option in the popup menu.
- Click to select the authorization in the account pane, and then
click the <=Remove button.
- Click to select the authorization in the account pane; next, click
the Actions menu, and then click the Remove option.
- For each added or removed authorization, if another SFA has piggybacked
changes:
- When prompted, review the changes triggered by the piggyback. By
default, all are checked for inclusion with your changes.
- To allow some or all of the suggested changes, click to uncheck
or check items as appropriate. To check every box, click the Select All button; to uncheck every
box, click the Deselect button.
Next, click the Submit
button.
- To prevent any piggybacked changes, click the Cancel
button.
- See the Overview of piggybacked
authorizations for details.
- For each added or removed authorization, if the SFA has an addIn
set up:
- When prompted, review the application-specific behaviors for the
system.
- Set up the behaviors as applicable for the user, then click the
File button.
- See Application Specific Behaviors
for details.
- All SFAs and/or authorizations to be added display in blue text
in the account pane. All SFAs and/or authorizations to be removed
are no longer listed on the right.
- To return account authorizations to their original settings without
changes, click the Reset button;
alternately, click the Actions menu, and then click the Reset option.
- To save your changes to the database:
- Click the Apply button;
alternately, click the Actions menu, and then click the Apply option.
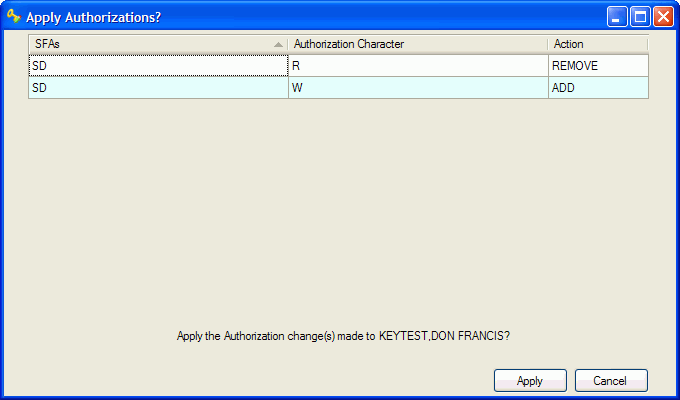
- When prompted, review the changes. If they're correct, click the
Apply button.
- When prompted, type your password, and then click the Ok
button.

 .
To hide the information, click
  .
. .
To hide the information, click
  .
. . To
hide the information, click
  .
.
